


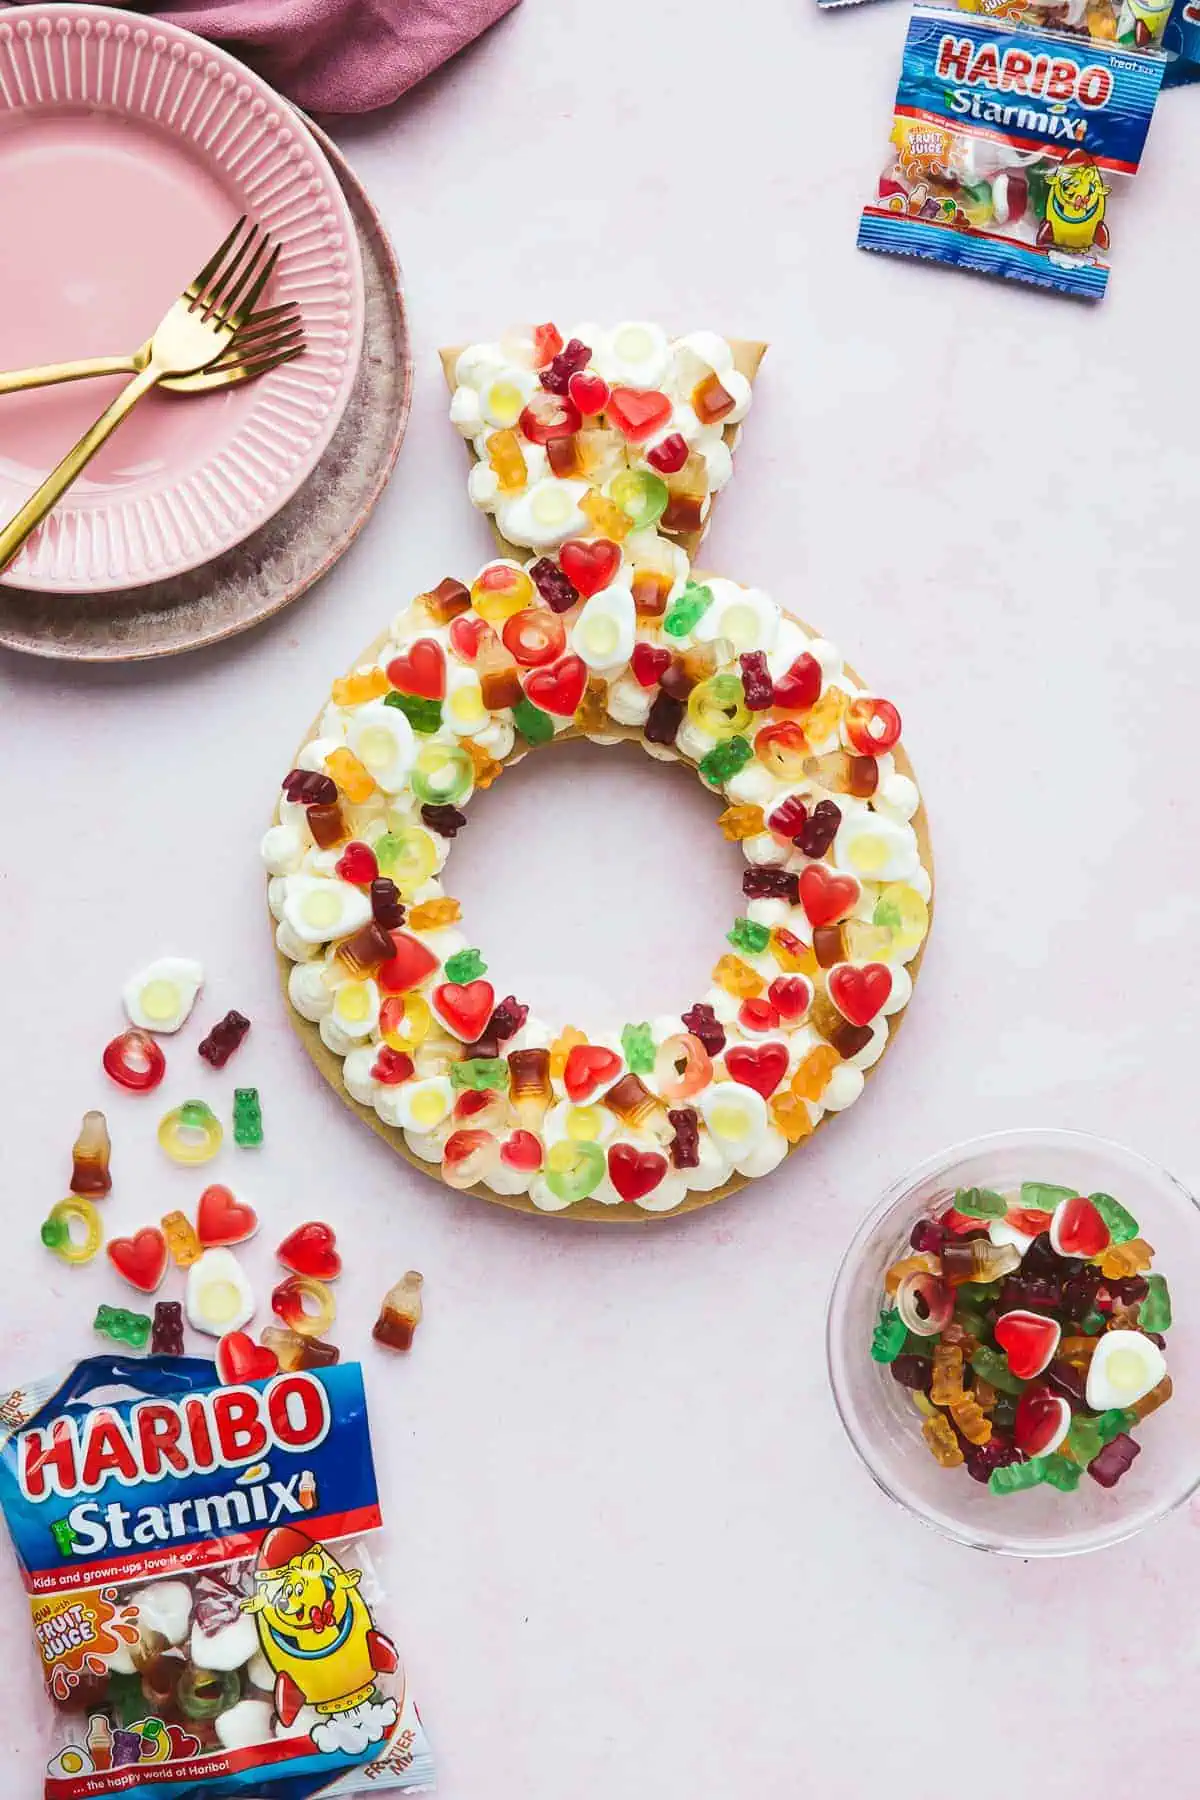
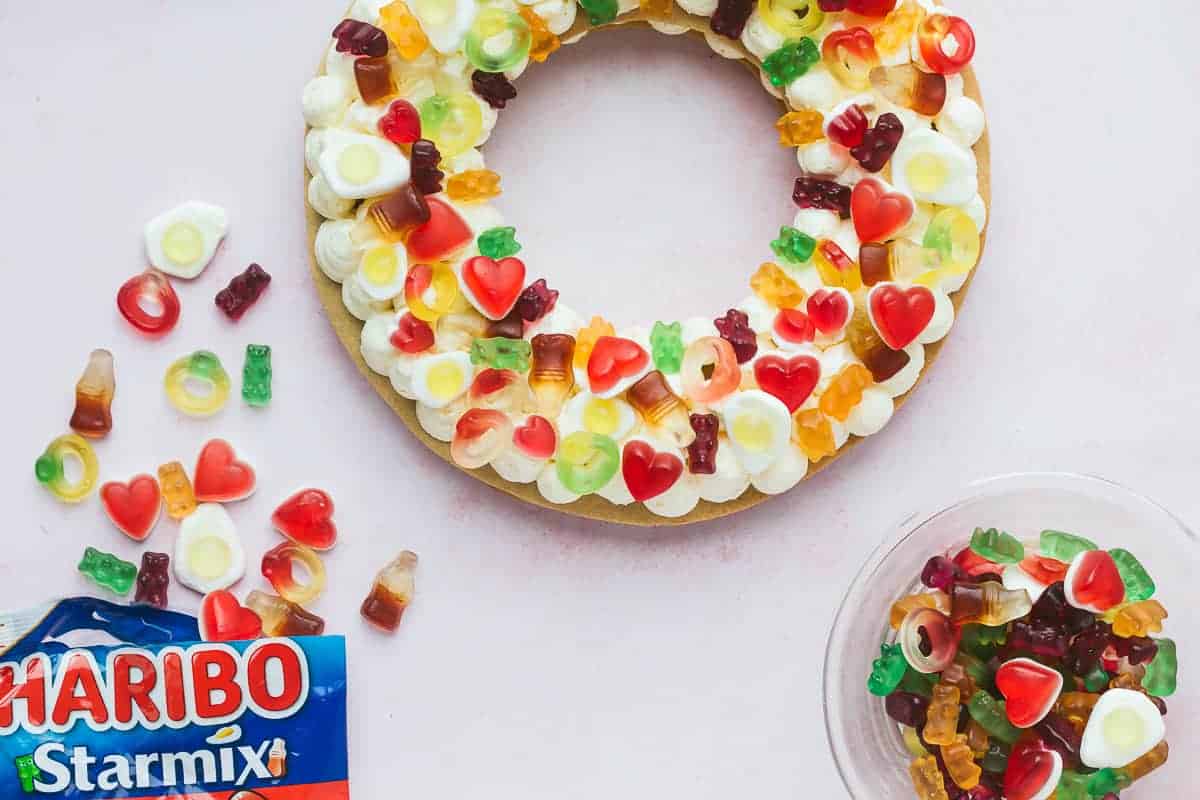
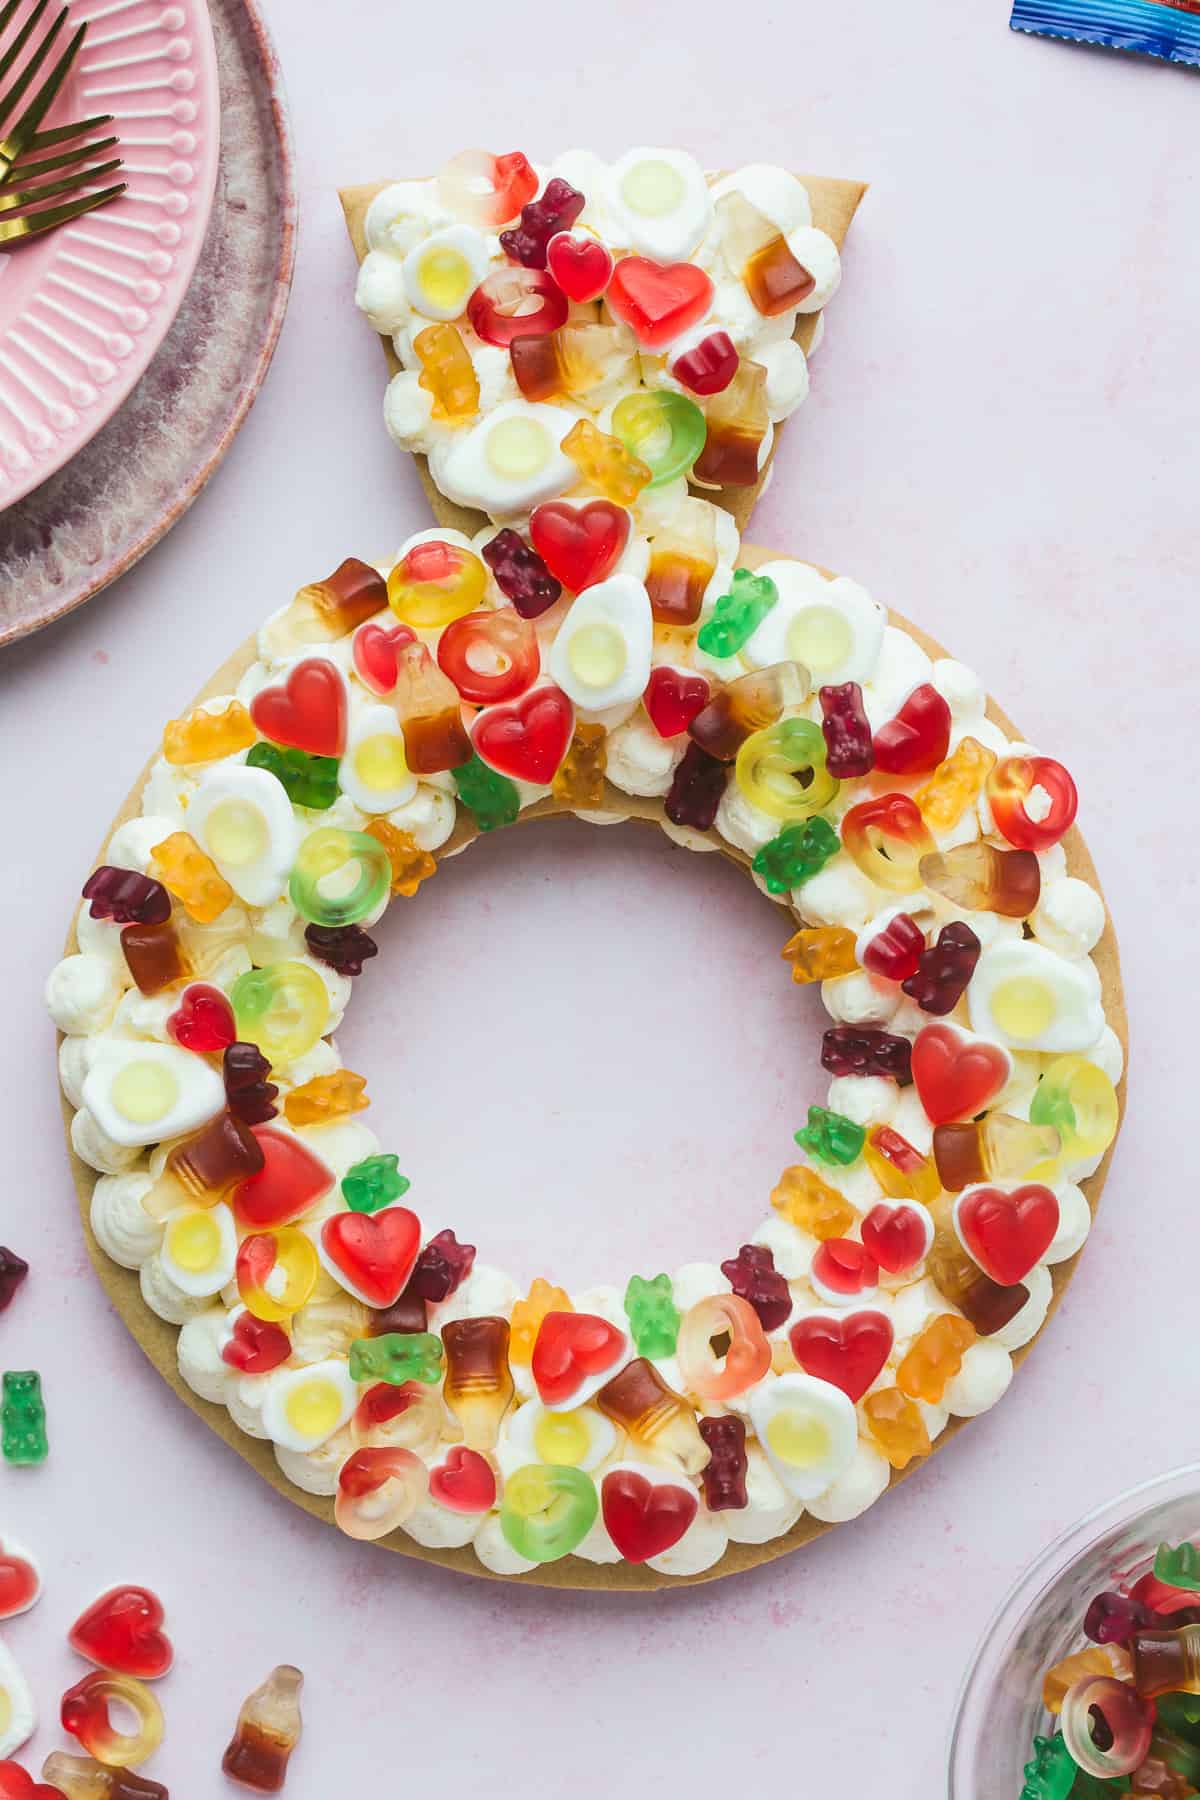
A beautiful cream tart, in the shape of a ring, made from a light and crisp vanilla biscuit, filled with buttercream icing and decorated with HARIBO Starmix.
Cream tarts and letter cookies have been a popular trend for a number of years now. You just have to look at one to understand why people enjoy them so much. They make such a beautiful centrepiece and are very easy to make at home.
I've brought my favourite Starmix to life by creating a ring-shaped cream tart masterpiece!
How to make a ring-shaped cream tart
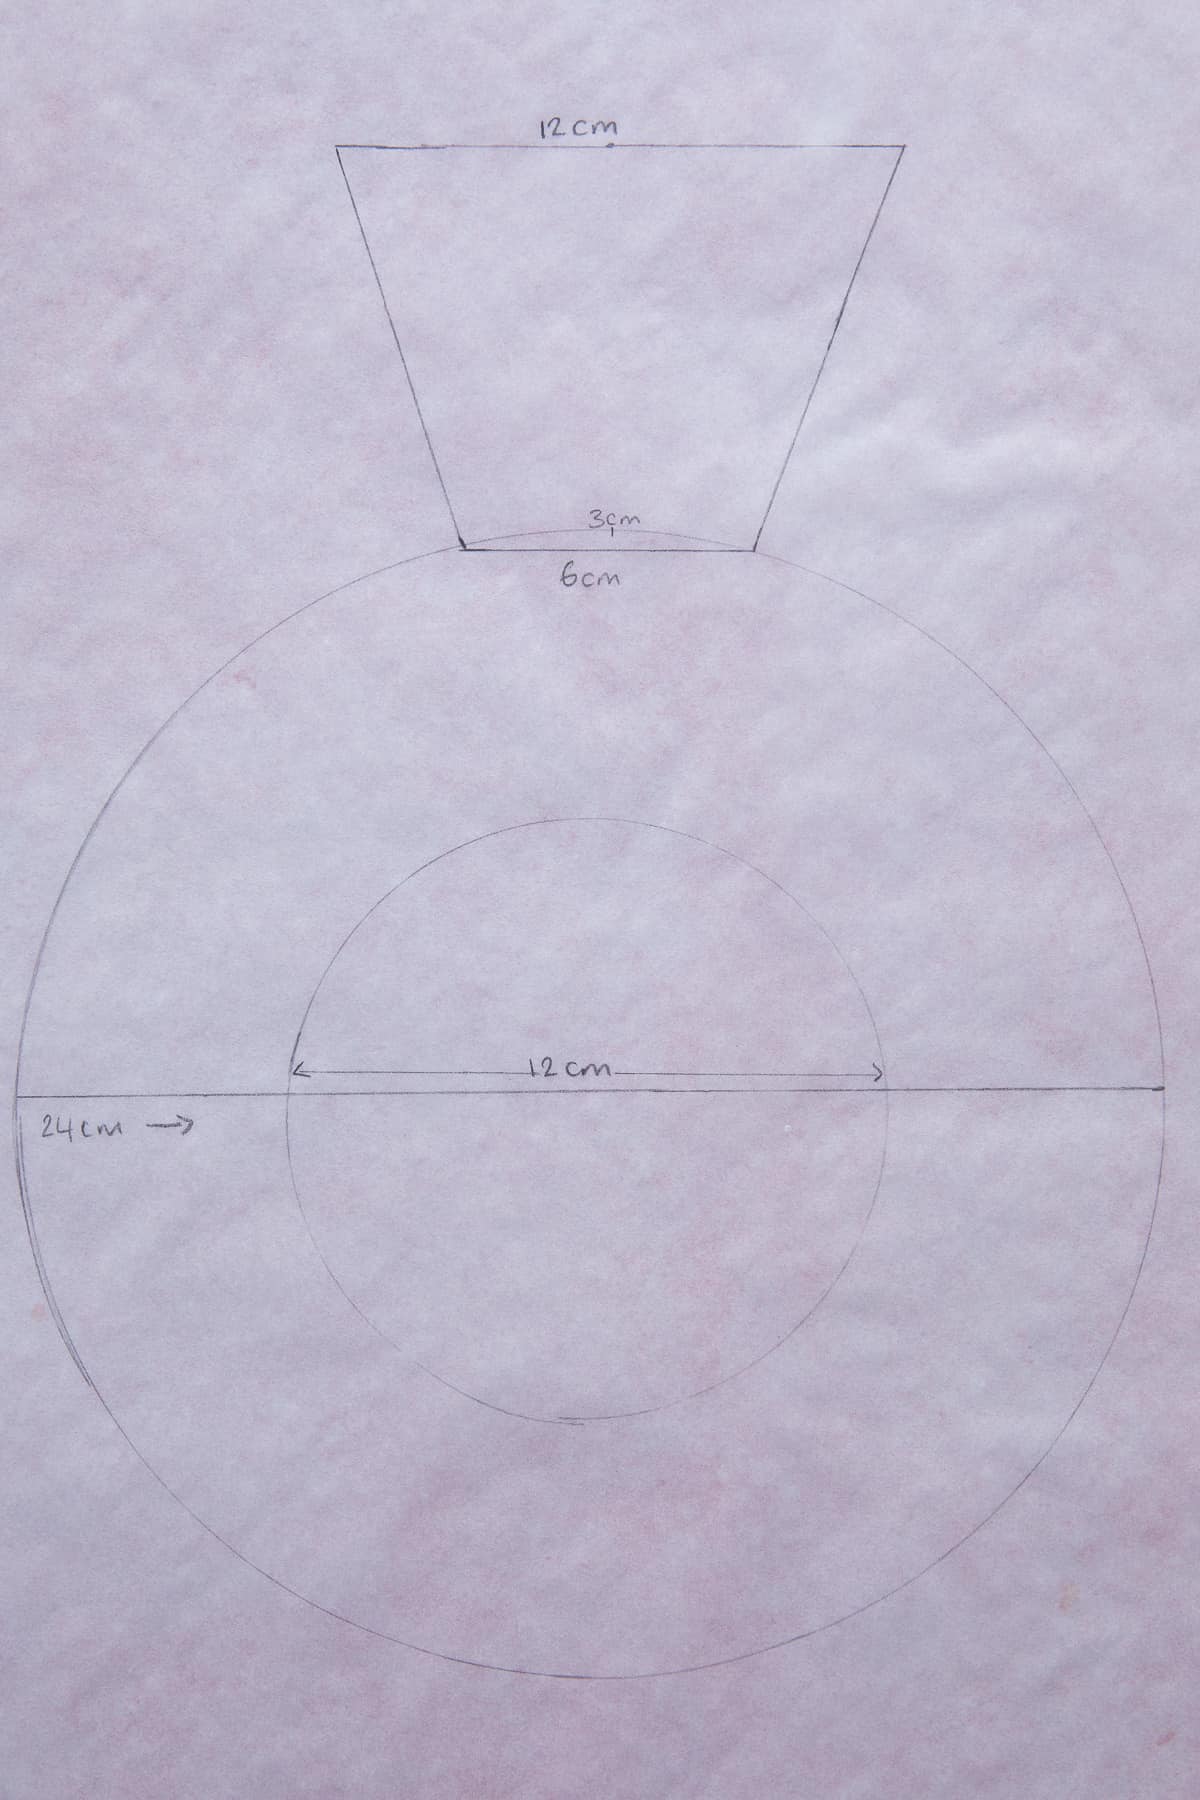
To make the ring shape, I drew around a dinner plate then put a small bowl in the middle to make the circle.
For the ring part, I used a ruler to find the middle of the circle then measured up 8cm and marked where the centre is. The top line of the ring is 12cm long and the bottom part is 6cm.
Once you have measured out the top and bottom lines, using the midpoint as a marker you can then draw diagonal lines from the end of the top and bottom lines to make the ring shape.
Use the diagram below to help you!
Vanilla biscuit layers
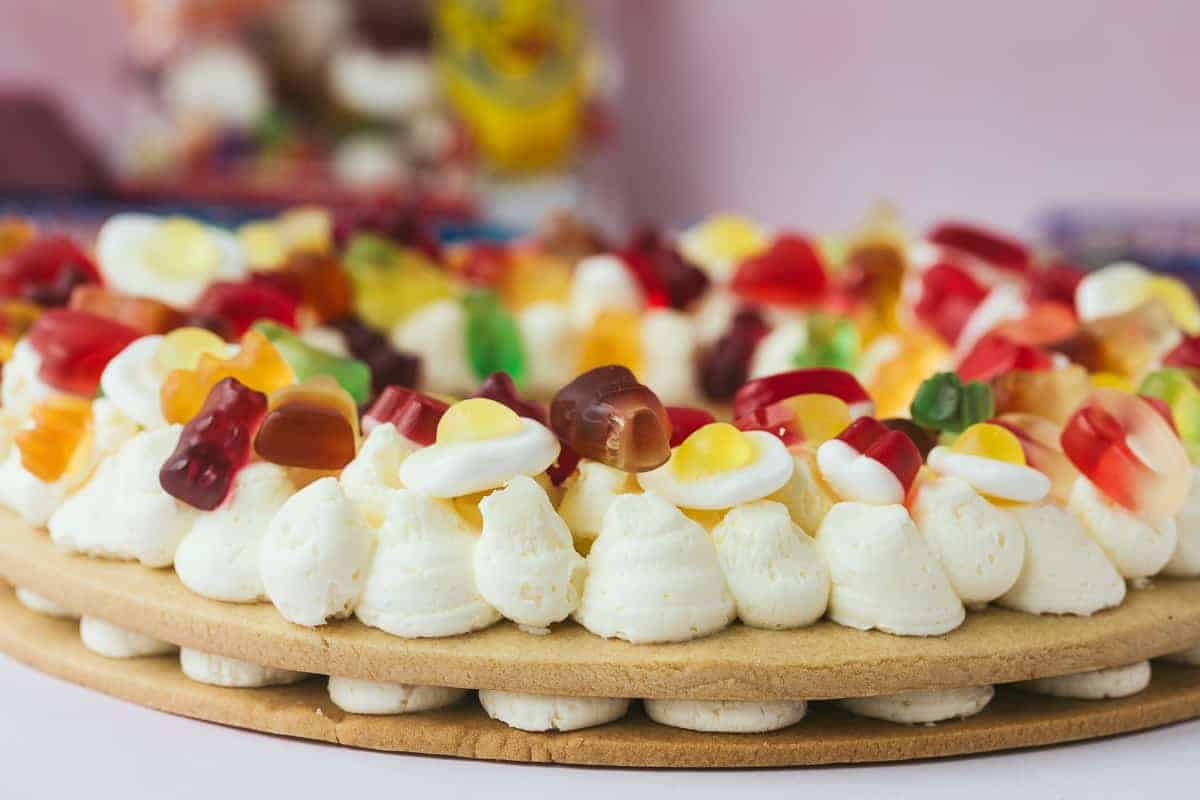
I based the cream tart recipe on my Simple Vanilla Biscuits. This type of biscuit is brilliant for this kind of baking because it will not spread or lose shape whilst you create your masterpiece.
The vanilla biscuit has a melt in your mouth texture and it's simple, quick and easy to make. It's also a really good recipe for making with kids because the dough is very forgiving and can be handled by little fingers quite a bit!
Buttercream and decoration
To fill the tart, I used a very basic vanilla buttercream. It's the perfect consistency for piping out round blobs of icing that sit nicely between the two layers. It's also a great base for holding decorations on top.
Speaking of decoration, doesn't the ring theme of the cream tart work amazingly well with all the HARIBO Starmix? I love using these sweets for decorating my bakes, like this HARIBO Starmix Piñata Cake.
HARIBO Starmix
This would be a brilliant bake for a special occasion and HARIBO Starmix is a great confectionary to decorate with because they look so pretty and everyone loves them.
It's definitely cause for a celebration because HARIBO Starmix have got even tastier!
Not possible, you say?
Well, I have to tell you I didn't think they could get any better but they have! HARIBO Starmix are now fruitier than ever before. The real fruit juice makes them even yummier and they also have new flavour combinations.
HARIBO Starmix has been around for more than 25 years, so they know a thing or two about making delicious sweets the whole family can enjoy. The iconic pieces - Heart, Ring, Cola Bottle, Egg and Bear stay the same but the flavours are fruitier.
I have to say, this mix is their best yet!
It's been an absolute pleasure coming up with a HARIBO Starmix themed bake. I'm so pleased with how it turned out and my family thoroughly enjoyed tucking in.
You can easily recreate this ring-shaped cream tart yourself at home and of course, we all have our favourite piece. So, tell me in the comments which HARIBO Starmix do you love the most?
This recipe was sponsored by HARIBO It was such a joy to design and bake a Cream Tart to celebrate the new Starmix. Thank you for supporting the brands that help make this website possible :-)

Cream Tart Ring Cake with HARIBO Starmix
A beautiful cream tart, in the shape of a ring, made from a light and crisp vanilla biscuit, filled with buttercream icing and decorated with HARIBO Starmix.
Ingredients
Vanilla biscuit
- 110g (½ cup) salted butter
- 110g (½ cup + 1 tbsp) caster sugar
- 110g (¼ cup + 1 tbsp) golden syrup
- 1 medium egg
- 1 teaspoon vanilla extract
- 320g (2 cups) plain flour
- 85g (½ cup) self-raising flour
Vanilla buttercream
- 250g (1 cup + 2 tbsp) salted butter
- 500g (3 + ¼ cups) icing sugar
- 1 teaspoon vanilla extract
- 2 tablespoon double cream (or milk)
Decoration
- 190g HARIBO Starmix (1 sharing bag)
Instructions
- Put the butter, sugar, golden syrup, egg and vanilla into a large mixing bowl. Use the paddle attachment of a stand mixer or a handheld electric whisk to beat the ingredients together on a medium speed until you can only see small lumps of butter. This will take 3-4 minutes.
- Turn the speed up to high and beat for a further minute.
- Sift both flours into the bowl and mix on a low speed until combined then turn the speed to medium. Mix for a minute or until you see a dough has formed and the mixture is coming away from the sides of the bowl.
- Bring the dough together with your hands then turn it out on to a lightly floured work surface. Knead briefly so that it is smooth then divide the dough in two and flatten it into disc shapes. Wrap in clingfilm and put it in the fridge to chill for 30 minutes.
- Meanwhile, make the ring template (follow the instructions and see measurements and template in the blog post). Preheat the oven to 150ºC/130ºC Fan/Gas 2.
- When the dough has chilled, roll it out between two sheets of baking paper to 1cm thick. Place the template on top and use a sharp knife to cut out the ring shape. Remove the template and slide the biscuit ring on to a baking sheet. Repeat for the second biscuit layer.
- Bake for 20 minutes, then leave the biscuit layers to completely cool before decorating.
- To make the buttercream, beat the butter on high speed until it's smooth and creamy then turn the speed down to low and add the icing sugar a little at a time. When all the icing sugar has been added beat on a high speed for 5 minutes until light and fluffy. Add the vanilla extract and double cream and beat for a further minute until combined.
- Transfer the buttercream to a piping bag fitted with an open round nozzle. Pipe the buttercream on to the first biscuit layer, then add the second layer on top pressing down lightly to fix the two layers together. Pipe the remaining buttercream on top of the second layer.
- Decorate with HARIBO Starmix, slice and enjoy!
Notes
- Any leftover dough can be used to make biscuits or you can roll it into a log shape and put it in the freezer. When needed, cut slices off and bake for 25 minutes.
- Buttercream should be the consistency of spreadable butter.
- If the buttercream is too thick, add a splash of double cream or milk. If it's too thin add icing sugar a tablespoon at a time.
- Store in an airtight container in a cool dark place for 2-4 days.
- Buttercream will harden over time.
Nutrition Information:
Yield: 15 Serving Size: 1Amount Per Serving: Calories: 104Total Fat: 3gSaturated Fat: 2gTrans Fat: 0gUnsaturated Fat: 1gCholesterol: 17mgSodium: 21mgCarbohydrates: 17gFiber: 0gSugar: 3gProtein: 2g


Leave a Reply